WordPressテーマ「Cocoon」のカスタマイズ備忘録です。以前にプロフィールボックスの「SANGO」風カスタマイズの記事を書きましたが、今回は「JIN」風のカスタマイズをやってみたいと思います。
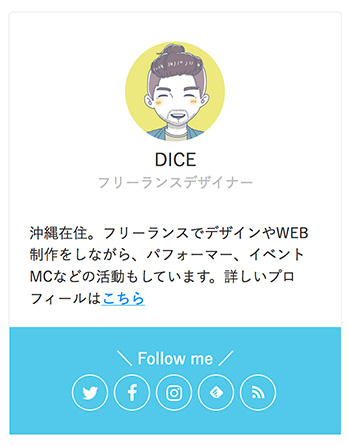
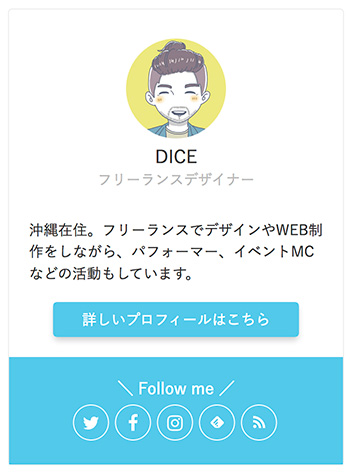
サイドバーではこんな感じ↓
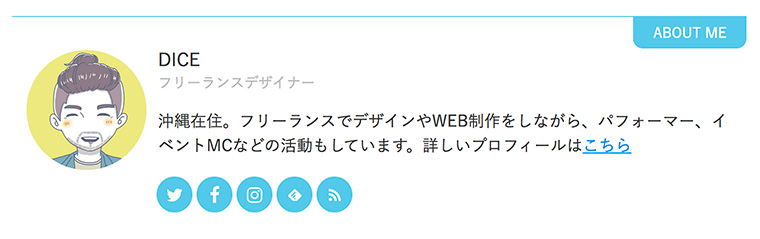
記事下メインカラムでの表示↓
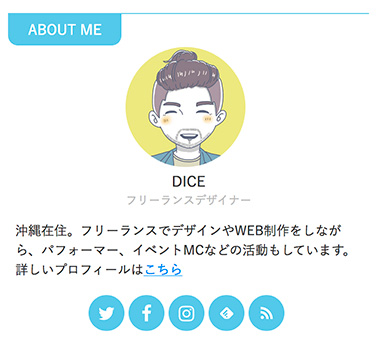
記事下メインカラムのスマホ表示↓
「JIN」と全く同じではなくて少しアレンジも加えています。CSSのコードは以下の3つに分けて紹介します。
- サイドバーのみに表示する場合
- 記事下のみに表示する場合
- サイドバーと記事下の両方に表示する場合
それではいってみましょう〜!
プロフィール欄を表示するための準備
カスタマイズの前にプロフィール情報を設定しておいてください。まだ設定していない場合はSANGO編の記事で手順を紹介しているので参考にどうぞ↓

functions.phpの編集
「JIN」風にカスタマイズするためには、プロフィールボックスを表示しているテンプレートを修正する必要があります。
Cocoonの親テーマの「lib」フォルダ内にある「html-forms.php」というファイルにプロフィールボックスを表示させるためのコードがありますが、そのコードを子テーマで修正するには「functions.php」で上書きします。
以下のコードをそのまま子テーマの「functions.php」にコピペしてください↓
//プロフィールボックス生成関数
if ( !function_exists( 'generate_author_box_tag' ) ):
function generate_author_box_tag($id = null, $label = null, $is_image_circle = 0){
  $user_id = get_the_author_meta( 'ID' );
  if (!$user_id || is_404()) {
    $user_id = get_sns_default_follow_user();
  }
  if ($id && get_userdata( $id )) {
    $user_id = $id;
  }

  ?>
  <div class="author-box border-element no-icon cf">
    <?php //ウィジェット名がある場合
    $image_class = $is_image_circle ? ' circle-image' : null; ?>
    <figure class="author-thumb<?php echo $image_class; ?>">
      <?php echo get_avatar( $user_id, 200 ); ?>
    </figure>
      <div class="author-name">
        <?php
        if ($user_id) {
          $description = get_the_author_description_text($user_id);
          //$description = trim(get_the_author_description_text());
          if (empty($description)) {
            $description = get_the_author_meta('description', $user_id);
          }
          $description = wpautop($description);

          if (!is_buddypress_page()) {
            //プロフィールページURLの取得
            $profile_page_url = get_the_author_profile_page_url($user_id);

            $author_display_name = strip_tags(get_the_author_display_name($user_id));
            if ($profile_page_url) {
              $name = '<a href="'.$profile_page_url.'">'.$author_display_name.'</a>';
              //$name = get_nofollow_link($profile_page_url, $author_display_name);
              //echo $name;
            } else {
              //$name = get_the_author_posts_link($user_id);
              $user = get_userdata( $user_id );
              $name = sprintf( '<a href="%1$s" title="%2$s" rel="author">%3$s</a>',
                esc_url( get_author_posts_url( $user->ID, $user->user_nicename ) ),
                /* translators: %s: author's display name */
                esc_attr( sprintf( __( 'Posts by %s' ), $user->display_name ) ),
                $user->display_name
              );
              //_v($user);
            }
          } else {
            $author_display_name = strip_tags(get_the_author_display_name($user_id));
            $author_website_url = strip_tags(get_the_author_website_url($user_id));
            $description = strip_tags($description);
            $name = $author_display_name;
            if ($author_website_url) {
              $name = '<a href="'.$author_website_url.'" target="_blank" rel="nofollow">'.$author_display_name.'</a>';
            }
            //echo $name;
          }
          echo apply_filters( 'the_author_box_name', $name );


        } else {
          echo __( '未登録のユーザーさん', THEME_NAME );
        }
         ?>
      </div>
    <?php if ($label): ?>
      <div class="author-widget-name">
        <?php echo $label; ?>
      </div>
     <?php endif ?>
    <div class="author-content">
      <div class="author-description">
        <?php
        if ($description) {
          echo $description;
        } elseif (!$user_id) {
          if (is_buddypress_exist()) {
            echo __( '未登録のユーザーさんです。', THEME_NAME );
            echo '<br>';
            echo __( 'ログイン・登録はこちら→', THEME_NAME );
            echo '<a href="'.wp_login_url().'">';
            echo __( 'ログインページ', THEME_NAME );
            echo '</a>';
          }

        } elseif (is_user_logged_in()) {
          echo __( 'プロフィール内容は管理画面から変更可能です→', THEME_NAME ).'<a href="/wp-admin/user-edit.php?user_id='.get_the_author_meta( 'ID' ).'">'.__( 'プロフィール設定画面', THEME_NAME ).'</a><br>'.__( '※このメッセージは、ログインユーザーにしか表示されません。', THEME_NAME );
        }
        ?>

      </div>

      <?php if ($user_id): ?>
      <div class="author-follows">
        <?php
        set_query_var( '_USER_ID', $user_id );
        get_template_part('tmp/sns-follow-buttons');
        set_query_var( '_USER_ID', null ); ?>
      </div>
      <?php endif ?>
    </div>
  </div>
<?php
}
endif;少し長いですがコピペするだけなので、ちゃんと1文字残らず選択できているかだけ気を付けてください。
サイドバーだけにプロフィールボックスを表示する場合
サイドバーだけに表示する時は、以下のコードをCSSに追加してください↓
.author-box .author-name { /*ニックネームのスタイル指定*/
  font-size: 1em;
  font-weight: normal;
  margin-bottom: 0;
}
.author-name a {
  text-decoration: none;
  color: #333; /*ニックネームの文字色*/
}
.author-widget-name { /*肩書きのスタイル指定*/
  font-size: 0.8em;
  color: #bbb;
}
.author-box p { /*プロフィール文のスタイル指定*/
  margin-top: 2em;
  line-height: 1.5;
  font-size: 0.9em;
}
.author-box { /*全体を囲むボックスのスタイル指定*/
  border: 1px solid #eee;
  border-radius: 4px;
  margin: 1em 0;
  line-height: 1.4;
  position: relative;
  padding: 1.4% 2% 1.8%;
}
.author-follows { /*フォローボタンボックスのスタイル指定*/
  background: #72c7e6; /*フォローボタンボックスの背景色*/
  margin: 0 -20px -20px -20px;
  padding: 20px 0;
}
.author-box .sns-follow-message { /*フォローボタン上部メッセージのスタイル指定*/
  display: block;
  color: #fff;
}
.author-box .sns-follow-buttons a.follow-button { /*ボタンのスタイル指定*/
  font-size: 18px;
  width: 36px;
  height: 36px;
  border-radius: 50%;
  margin-bottom: 4px;
  margin-right: 4px;
  background: none; /*フォローボタン背景*/
  color: #fff; /*アイコンの色*/
  border: 1px solid #fff; /*ボーダーの指定*/
  transition: .5s;
}
.author-box .sns-follow-buttons a.follow-button:hover {
  background: #2ea5d0; /*フォローボタンのマウスホバー時の背景色*/
  opacity: 1;
}
.author-box a.follow-button span {
  line-height: 32px;
}
.author-box .icon-twitter-logo::before {
  font-family: FontAwesome;
  content: "\f099"
}
.author-box .icon-facebook-logo::before {
  font-family: FontAwesome;
  content: "\f09a";
}
.author-box .icon-instagram-new::before {
  font-family: FontAwesome;
  content: "\f16d";
}
.author-box .icon-hatebu-logo::before {
  font-family: Verdana;
  content: 'B!';
  font-weight: bold;
}
.author-box .icon-google-plus-logo::before {
  font-family: FontAwesome;
  content: "\f0d5";
}
.author-box .icon-youtube-logo::before {
  font-family: FontAwesome;
  content: "\f167";
}
.author-box .icon-pinterest-logo::before {
  font-family: FontAwesome;
  content: "\f231";
}
.author-box .icon-amazon-logo::before {
  font-family: FontAwesome;
  content: "\f270";
}
.author-box .icon-github-logo::before {
  font-family: FontAwesome;
  content: "\f09b";
}
各部のカラーなどはコード内に記載したコメントを参考にお好みで変更してください。
「SANGO」風の時と同様に、アイコンはCocoonのデフォルトだと大きさにバラつきがあるので「Font Awesome」で代用できるものは変更しています。
プロフィールのウィジェットの設定
CSSを追加したらウィジェットを設定すればプロフィールが表示されます。
管理画面のメニューから「ウィジェット」のページを開いて「サイドバー」に「[c]プロフィール」を追加します↓
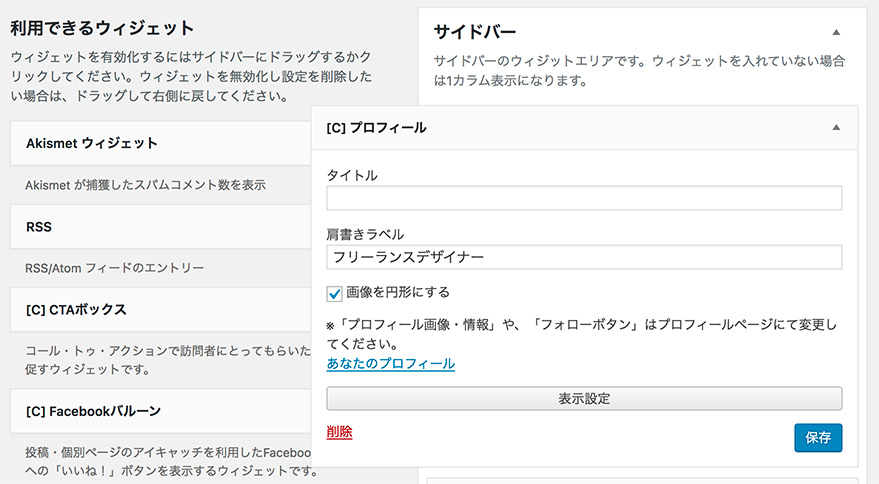
タイトルは未入力のままで、「肩書きラベル」だけ入力します。あと「画像を円形にする」のチェックを入れて「保存」ボタンを押せば完了です。
FeedlyとRSSボタンを非表示にしたい場合
FeedlyとRSSのボタンはプロフィール設定に関係なく表示されるので、消したい場合は下記のCSSを追記すればオッケーです。
.author-box .feedly-button, .author-box .rss-button {
  display: none!important;
}
記事下だけにプロフィールボックスを表示する場合
次は記事下のメインカラムだけに表示する場合です。以下のコードをCSSにコピペしてください↓
.author-box .author-name { /*ニックネームのスタイル指定*/
  font-size: 1em;
  font-weight: normal;
  margin-bottom: 0;
}
.author-name a {
  text-decoration: none;
  color: #333; /*ニックネームの文字色*/
}
.author-widget-name { /*肩書きのスタイル指定*/
  font-size: 0.8em;
  color: #bbb;
}
.author-box p { /*プロフィール文のスタイル指定*/
  margin-top: 1em;
  line-height: 1.5;
  font-size: 0.9em;
}
.author-box { /*全体を囲むボックスのスタイル指定*/
  border: none;
  border-top: 1px solid #72c7e6;
  margin: 1em 0;
  padding: 30px 2% 1.8%;
  line-height: 1.4;
  position: relative;
}
.author-box::after { /*全体を囲むボックス上部の見出し設定*/
  content: "ABOUT ME";
  font-size: 14px;
  background: #72c7e6;
  border-radius: 0 0 10px 10px;
  color: #fff;
  padding: 6px 20px;
  position: absolute;
  top: 0;
  right: 0;
}
.author-follows {
  background: none;
  margin: 0;
  padding: 0;
}
.author-box .sns-follow-message {
  display: none;
}
.author-box .sns-follow-buttons a.follow-button { /*フォローボタンのスタイル指定*/
  font-size: 18px;
  width: 36px;
  height: 36px;
  border-radius: 50%;
  margin-bottom: 4px;
  margin-right: 4px;
  background: #72c7e6; /*フォローボタン背景*/
  color: #fff; /*アイコンの色*/
  border: none; /*ボーダーの指定*/
  transition: .5s;
}
.author-box .sns-follow-buttons a.follow-button:hover {
  background: #2ea5d0; /*フォローボタンのマウスホバー時の背景色*/
  opacity: 1;
}
.author-box a.follow-button span {
  line-height: 32px;
}
@media screen and (max-width: 480px){
.author-box {
  text-align: center;
  font-size: 0.9em;
}
.author-box::after {
  right: auto;
  left: 0;
}
.author-thumb {
  float: none;
  margin-top: 3px;
  width: 120px;
  display: inline-block;
}
.author-box .author-thumb {
  float: none;
  margin-top: 3px;
  width: 120px;
}
.author-box .author-thumb img {
  margin: 0 auto;
}
.author-box .author-content {
  margin: 0;
}
.author-description {
  text-align: left;
}
.author-box .sns-follow-buttons {
  justify-content: center;
}
}
.author-box .icon-twitter-logo::before {
  font-family: FontAwesome;
  content: "\f099"
}
.author-box .icon-facebook-logo::before {
  font-family: FontAwesome;
  content: "\f09a";
}
.author-box .icon-instagram-new::before {
  font-family: FontAwesome;
  content: "\f16d";
}
.author-box .icon-hatebu-logo::before {
  font-family: Verdana;
  content: 'B!';
  font-weight: bold;
}
.author-box .icon-google-plus-logo::before {
  font-family: FontAwesome;
  content: "\f0d5";
}
.author-box .icon-youtube-logo::before {
  font-family: FontAwesome;
  content: "\f167";
}
.author-box .icon-pinterest-logo::before {
  font-family: FontAwesome;
  content: "\f231";
}
.author-box .icon-amazon-logo::before {
  font-family: FontAwesome;
  content: "\f270";
}
.author-box .icon-github-logo::before {
  font-family: FontAwesome;
  content: "\f09b";
}
記事下のウィジェットを設定する
管理画面のメニューから「ウィジェット」のページを開いて「投稿本文下」に「[c]プロフィール」を追加します↓

サイドバーの時と内容は同じですが、ウィジェットを置く場所は「投稿SNSボタン下」や「投稿コメントフォーム下」など好きな場所で大丈夫です。
「保存」ボタンを押したら適当なページを開いてちゃんと表示されているか確認してみてください↓
サイドバーと記事下の両方に表示する場合
両方に表示する場合は、以下のコードを使用してください。
.author-box .author-name {
  font-size: 1em;
  font-weight: normal;
  margin-bottom: 0;
}
.author-name a {
  text-decoration: none;
  color: #333;
}
.author-widget-name {
  font-size: 0.8em;
  color: #bbb;
}
.author-box p {
  margin-top: 2em;
  line-height: 1.5;
  font-size: 0.9em;
}
.author-box {
  border: 1px solid #eee;
  border-radius: 4px;
  margin: 1em 0;
  line-height: 1.4;
  position: relative;
  padding: 1.4% 2% 1.8%;
}
.author-follows {
  background: #72c7e6;
  margin: 0 -20px -20px -20px;
  padding: 20px 0;
}
.author-box .sns-follow-message {
  display: block;
  color: #fff;
}
.author-box .sns-follow-buttons a.follow-button {
  font-size: 18px;
  width: 36px;
  height: 36px;
  border-radius: 50%;
  margin-bottom: 4px;
  margin-right: 4px;
  background: none;
  color: #fff;
  border: 1px solid #fff;
  transition: .5s;
}
.author-box .sns-follow-buttons a.follow-button:hover {
  background: #2ea5d0;
  opacity: 1;
}
.author-box a.follow-button span {
  line-height: 32px;
}
main .author-box p {
  margin-top: 1em;
}
main .author-box {
  border: none;
  border-top: 1px solid #72c7e6;
  border-radius: 0;
  padding-top: 30px;
}
main .author-box::after {
  content: "ABOUT ME";
  font-size: 14px;
  background: #72c7e6;
  border-radius: 0 0 10px 10px;
  color: #fff;
  padding: 6px 20px;
  position: absolute;
  top: 0;
  right: 0;
}
main .author-follows {
  background: none;
  margin: 0;
  padding: 0;
}
main .author-box .sns-follow-buttons a.follow-button {
  background: #72c7e6;
  border: none;
}
main .author-box .sns-follow-message {
  display: none;
}
@media screen and (max-width: 480px){
main .author-box {
  text-align: center;
  font-size: 0.9em;
}
main .author-box::after {
  right: auto;
  left: 0;
}
main .author-thumb {
  float: none;
  margin-top: 3px;
  width: 120px;
  display: inline-block;
}
main .author-box .author-thumb {
  float: none;
  margin-top: 3px;
  width: 120px;
}
main .author-box .author-thumb img {
  margin: 0 auto;
}
main .author-box .author-content {
  margin: 0;
}
main .author-description {
  text-align: left;
}
main .author-box .sns-follow-buttons {
  justify-content: center;
}
}
.author-box .icon-twitter-logo::before {
  font-family: FontAwesome;
  content: "\f099"
}
.author-box .icon-facebook-logo::before {
  font-family: FontAwesome;
  content: "\f09a";
}
.author-box .icon-instagram-new::before {
  font-family: FontAwesome;
  content: "\f16d";
}
.author-box .icon-hatebu-logo::before {
  font-family: Verdana;
  content: 'B!';
  font-weight: bold;
}
.author-box .icon-google-plus-logo::before {
  font-family: FontAwesome;
  content: "\f0d5";
}
.author-box .icon-youtube-logo::before {
  font-family: FontAwesome;
  content: "\f167";
}
.author-box .icon-pinterest-logo::before {
  font-family: FontAwesome;
  content: "\f231";
}
.author-box .icon-amazon-logo::before {
  font-family: FontAwesome;
  content: "\f270";
}
.author-box .icon-github-logo::before {
  font-family: FontAwesome;
  content: "\f09b";
}
プロフィール詳細のボタンを表示する場合
やり方は「SANGO」風カスタマイズ記事の最後の部分で紹介していますので参考にしてみてください↓
まとめ
今回は「JIN」風のカスタマイズ方法のご紹介でした。「SANGO」風のカスタマイズと混ぜたりしてもオリジナリティが出て面白いかと思います。
皆さんも挑戦してみてくださいね!ではまた〜♪
comment
お世話になります。
CSS初心者なので、いつも参考にさせていただいております。
本記事を参考にプロフィールをカスタマイズしてみたのですが、サイドバーにおいて、SNSフォローボタンの上のメッセージが「〇〇(ニックネーム)をフォローする」になってしまいます。
お手本のように「\Follw me/」とするには、どのような手入れをしたらよいでしょうか。
色々いじってみてもうまくいかず、恥ずかしながらこちらで質問させていただきます。
見落とし等ありましたら申し訳ありません。
こんにちは!説明不足ですいません^^;
Cocoon設定 > SNSフォロー にある「フォローメッセージ」の内容が反映されますので確認してみてください。